

Oauth2 in simple words


If you are creating a product for your startup or a side project, you must have stumbled upon this daunting phenomenon of Oauth2. With millions of tutorials telling you what to do and each authorization service provider (e.g. Okta, Google, etc) telling you what their format is, the whole space around Oauth2 has become very confusing for a beginner. Hence in this article, we will be concentrating on what really is Oauth2 fundamentally
In core Oauth2 is just a protocol for authorization delegation.
First, let's dissect this statement, and then we will look at the protocol. To understand authorization delegation let us take a real-life example. Assume you cook very delicious burgers and have now decided to open your own fast-food chain. So the two main components of your enterprise will be billing and production. Since your core competency is making burgers, you may hire a guy who will collect payments and give tokens to the customer. The customer then will give you that token in return for a tasty burger. Now if you look closely this token authorizes the customer to get a burger from you. Since you have delegated the responsibility of generating the authorization tokens to the guy you hired, you are effectively following authorization delegation.
Now extending the above analogy to our computer world, we will create services that are core to our functionality and will delegate the work of authorization to external vendors (you must have seen "login with google", etc.). These vendors will generate authorization tokens, which can then be used by our services.
Now after understanding the concept of authorization delegation, let us dive into the rabbit hole of the Oauth2 protocol (there is Oauth1 also, but it is almost deprecated so we won't be discussing that here).
There are a few terms (or jargon) used in the Oauth2 scope, so let us first understand them
- Resource Owner:- it is the user/entity who owns the data (for e.g. you own your data on Facebook servers)
- Resource Server:- the service which has delegated the authorization responsibilities
- Client App:- the frontend interface of your service, through which you interact with the user
- Authorization Server:- the service/vendor which authorizes the user/entity
- Scopes:- permissions are called scopes in Oauth2
Now we can start our exploration of the protocol. Extending the above burger shop analogy, we need a process/protocol which the hired guy and you will follow to generate and validate the tokens. This will ensure better communication, reduced confusion, and faster deliveries as a result. In the computer world there exist many such protocols and Oauth2 is the most famous of them all.
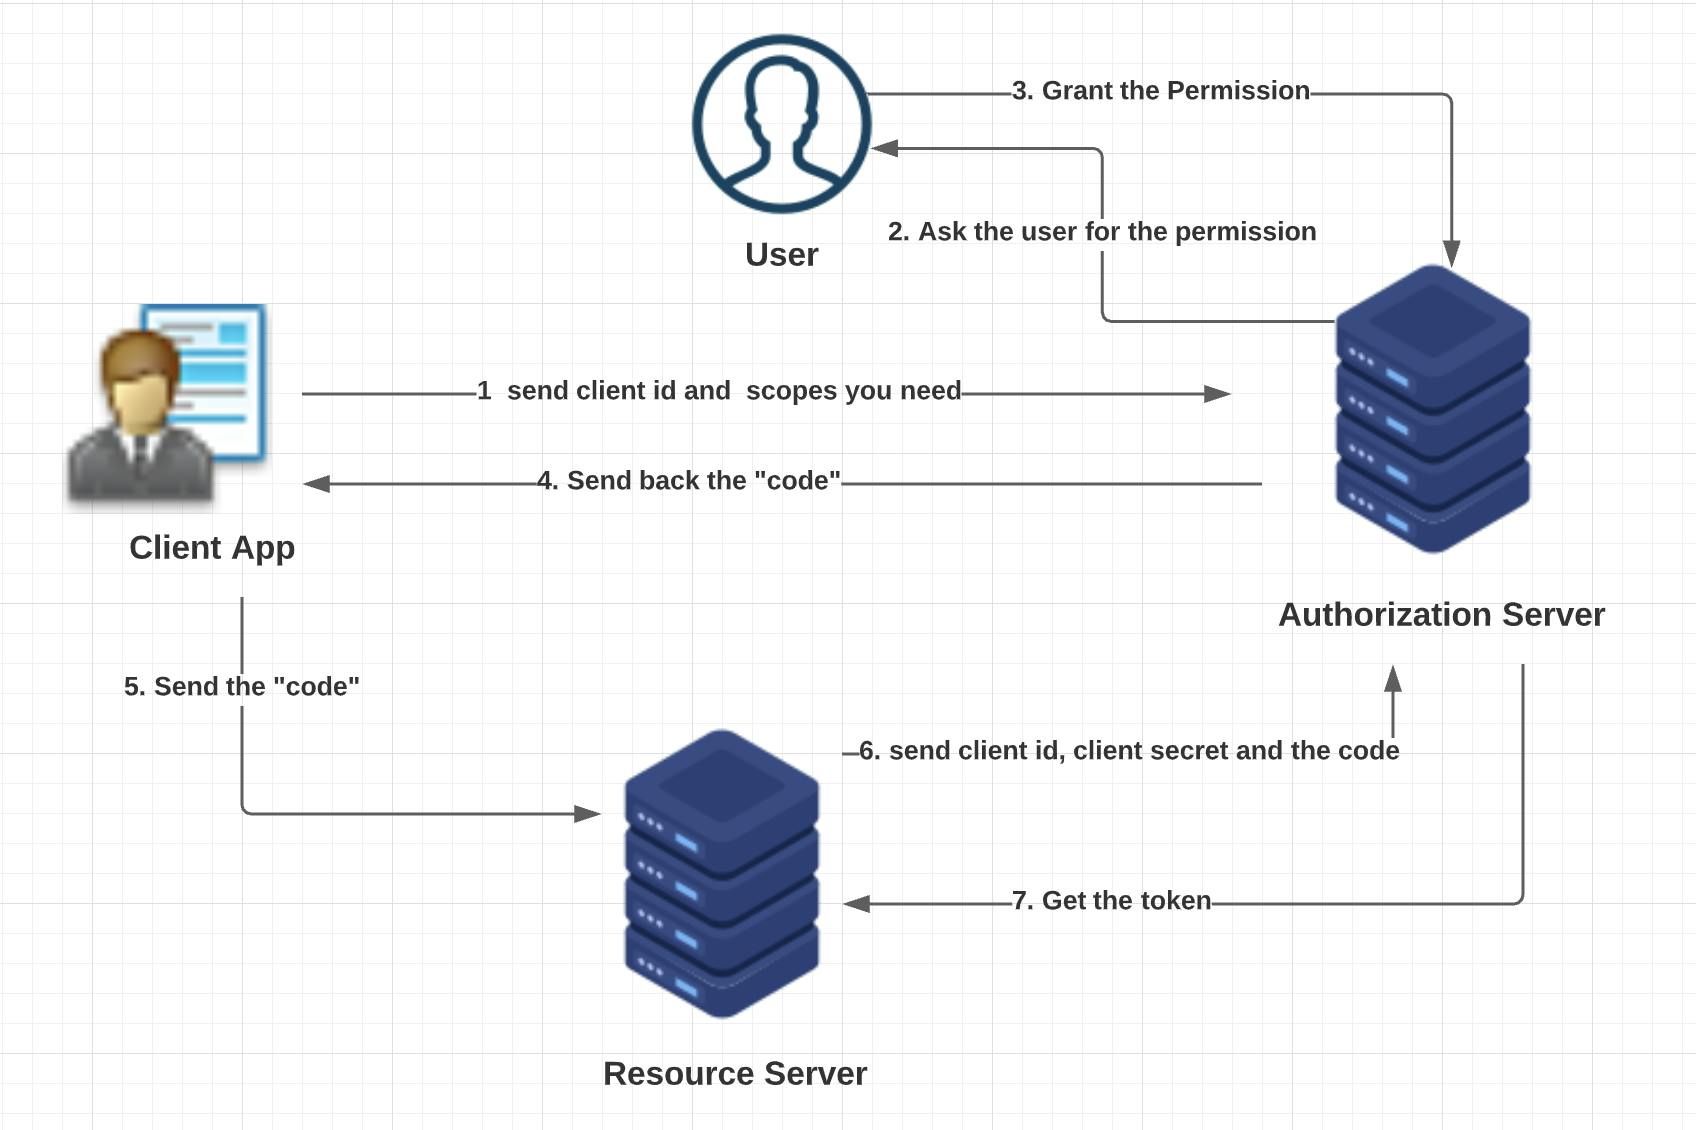
- The first step in the protocol is that you register your Client app with the authorization server. You also need to tell the authorization server what all scopes you need. The authorization server will in turn give you a "client id" and a "client secret"
- Now when the user interacts with your client app, they will first be redirected to the authorization server page. They will be asked if the authorization server should be allowed to authorize (steps 1 to 4 in the above diagram)
- If the user accepts, then the authorization server will give a "code" to the app client (Step 4 in the diagram). Please note this is not the final token
- The resource server will use this "code" and will combine it with "client id" and "client secret" and will call the authorization server (Step 6 in the diagram).
- The authorization server will finally give the resource server a token (Step 7 in the diagram). Usually, this is a jwt token.
- This final jwt token is our authorization token
That's it, broadly this is the whole Oauth2 protocol.
You must now be wondering why not give the token directly to the app client in step 4 instead of the code. That would in turn save three additional network calls and will reduce the complexity as well.
The reason we do no do that is very practical and nuanced. As you know keeping secrets on the front channel (or the frontend apps) is never a safe option. Hence anyone can get the token if we give the token directly there. On the other hand, communication between the resource server and the authorization server is on the back channel. The backchannel is often very secure, plus we can easily keep the secret (the client secret ) on the backend.
Finally, a bonus point -> Oauth2 is used for authorization but how do so many apps authenticate using it (as we have seen so many apps using login with google/FB/Twitter, etc). The authentication magic is done by yet another protocol know as Open ID Connect (OIDC). We will be discussing that in the next article.